
Ubuntu is, perhaps, one of the most accessible distributions of Linux available to the home computer user or enthusiast. If you are interested in experimenting with Linux, you can do worse than to test-drive Ubuntu from a USB drive. In this tutorial I'll show you how to create an Ubuntu USB live-drive, using a Mac, to test on a Mac.
Ubuntu, a Nguni Bantu term meaning Human-ness, recently released version 14.04 LTS (Long Term Support) codename Trusty Tahr. Based on Debian Linux, Ubuntu is estimated to be used on more than 26% of all Linux websites.
Since its first release in October 2004, it is estimated that, in 2011, Ubuntu had in excess of 20-million users worldwide and it is being increasingly adopted for large-scale public sector deployments, notably the Gendarmerie Nationale, thus replacing expensive Microsoft Office licences with OpenOffice for 5,000 workstations.
Regardless of whether you have thousands of workstations, or not, experimenting with Ubuntu from a USB drive is a good way to get an introduction to this interesting and alternative operating system.
How to Create a Bootable Ubuntu USB Drive
1. Format a USB Drive
The first part of the process is to format a USB drive such that it is bootable on a Mac.
Find a USB drive, of 2GB capacity or more, and plug it into the Mac. Launch the Disk Utility app which is located in Applications > Utilities.


- In the left-hand pane, click on the USB drive to select it
- Click the Partition tab
- Select 1 Partition from the drop-down menu
- Enter a name for the drive, in this example Ubuntu Mac
- Change the Format to Mac OS Extended (Journaled)
- Click the Options button


- Ensure that the GUID Partition Table radio button is selected and click OK
- Click Apply
2. Download Ubuntu


Open a web browser and navigate to the Ubuntu download page.
In the dropdown menu, under Choose your flavour, ensure that you select 64-bit Mac (AMD64) then click the Download button.
At the time of writing, the current version of Ubuntu is 14.04 LTS which was released in April 2014. The LTS denotes that this version is a Long Term Support version, in other words this version an LTS version includes updates for new hardware, security patches and updates to the Ubuntu stack for a period of five years following the version release.
3. Convert the Downloaded File Format
It is first necessary to convert the downloaded .iso file to a .img. This is done with the hdiutil command in Terminal.


Open Terminal and enter the following command:
1 |
hdiutil convert -format UDRW -o ~/path/to/target.img ~/path/to/ubuntu.iso |
Replace the /path/to/ with the actual path to the files in question, for example:
1 |
hdiutil convert -format UDRW -o ~/Downloads/ubuntu-14.04-desktop-amd64+mac ~/Downloads/ubuntu-14.04-desktop-amd64+mac |
Tip: OS X may append the file extension .dmg to the output file, so you'll end up with ubuntu-14.04-desktop-i386.img.dmg


4. Determine the Device Node for the USB Drive
Enter the following command, in Terminal, to determine the connected devices:
1 |
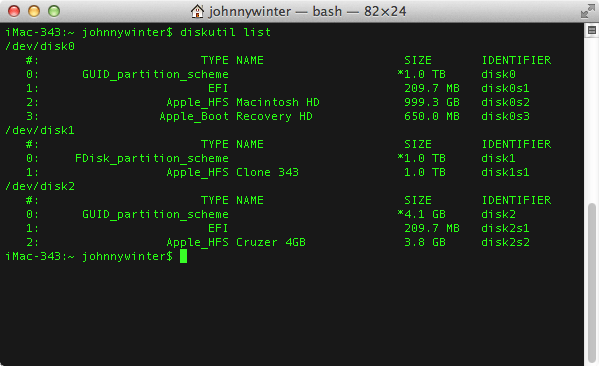
diskutil list |
Make a note of the output information. Then insert the USB drive and run the command again. Look for the difference and check that the capacity of the new drive matches the USB drive that you have inserted.


Once you have made a note of the identity of the USB drive, in my case /dev/disk2, execute the following command:
1 |
diskutil unmountDisk /dev/diskN |
Where N denotes the node number assigned to the USB drive. In my example, I run the command:
1 |
diskutil unmountDisk /dev/disk2 |
5. Create the Bootable USB Drive
To create the USB drive, the command dd is used to copy and convert a file. This is a very powerful command and it should be used with care and caution.
If used incorrectly it is possible to corrupt the the hard drive of a Mac with catastrophic consequences meaning that you will not be able to boot into OS X. Double-check, and triple-check, that you have entered the command correctly.


Enter the following command into the command line:
1 |
sudo dd if=/path/to/ubuntu-14.04-desktop-amd64+mac.img.dmg of=/dev/rdiskN bs=1m |
In my case, this is:
1 |
sudo dd if=/Users/johnnywinter/Downloads/ubuntu-14.04-desktop-amd64+mac.dmg of=/dev/rdisk2 bs=1m |
An explanation of the command used is:
-
sudomeans substitute user do and gives you greater privileges to carry out a command that you would normally not be able to execute -
ddmeans convert and copy
-
ifis the input file
-
ofis the output file
It will be necessary to enter the Mac's admin user password in order to proceed with this command, so enter the password at the Password: prompt in Terminal.
Note, when you enter the password, you will not see the characters or any asterisks as you might expect. Though the cursor does not move, Terminal is accepting the characters that are being entered.
Once the password has been entered, press the Enter key.
It is also important to note that there is no indication or display of progress whilst Terminal executes the command entered. Sit tight, it will take a few minutes to complete. Don't be tempted to interrupt the process in any way; be patient and wait for the confirmation from Terminal that the process has completed.
6. Prepare to Remove the USB Drive
It may be that, on completion of the creation of the USB drive, a dialogue box pops up that says The disk you inserted was not readable by this computer.


There are three buttons: Initialize..., Ignore and Eject. Don't click any of them!
Instead, return to Terminal where you should see a confirmation that the process has completed. In my example, the confirmation reads:
1 |
962+0 records in962+0 records out1008730112 bytes transferred in 182.599702 secs (5524270 bytes/sec) |


At the command prompt, enter the command:
1 |
diskutil eject /dev/diskN |
Where N is the node number assigned to the USB drive. In my case it is disk2, so the command entered is:
1 |
diskutil eject /dev/disk2 |
Regarding the dialogue box, click Ignore to get rid of it.
It is now safe to remove the USB drive from the Mac.
Test the Ubuntu USB Drive
The newly created Ubuntu USB drive is now ready to be inserted into a Mac as a live-drive from which you can run the Ubuntu operating system.


To test Ubuntu Linux on a Mac:
- insert the USB drive into an available USB port.
- Reboot, or turn on, the Mac
- Immediately after the start-up chime press the Option key (sometimes marked alt)
- Select the USB drive from which to boot by using the left and right arrow and Enter keys
Conclusion
In this tutorial, I have shown you how to download the correct version of Ubuntu Linux to test on a Mac. I have shown you how to correctly format a USB drive and how to copy Ubuntu to that drive in order to make a bootable live-drive.
I have also shown you how to boot from the drive, that you have created, to test Ubuntu Linux on a Mac.
If you want to do more with your Mac, check out some of the Mac apps available on Envato Market.
 By
By


