

If you use Excel regularly, I'm sure you've come across dates and times in your cells. Data often has a record of when it was created or updated, so knowing how to work with this data is essential.
Here are three key skills that you'll learn in this tutorial:
- How to format dates in Excel so that they appear in your preferred style
- Formulas to calculate the number of days, months, and years between two dates
- An Excel date formula to log today's date, and a keyboard shortcut to add the current time
Microsoft Excel can basically do anything with data, if you just know how. This tutorial is another key step to adding skills to your Excel toolbelt. Let's get started.
Excel Date and Time Formulas (Quick Video Tutorial)
This screencast will walk you through how to work with dates and times in Excel. I cover formatting dates to different styles, as well as Excel date formulas to calculate and work with dates. Make sure to download the free Excel workbook with exercises that I've attached to this tutorial.
Keep reading for a written reference guide on how to format dates and times in Excel, and work with them in your formulas. I'll even share several tips that weren't covered in the screencast.
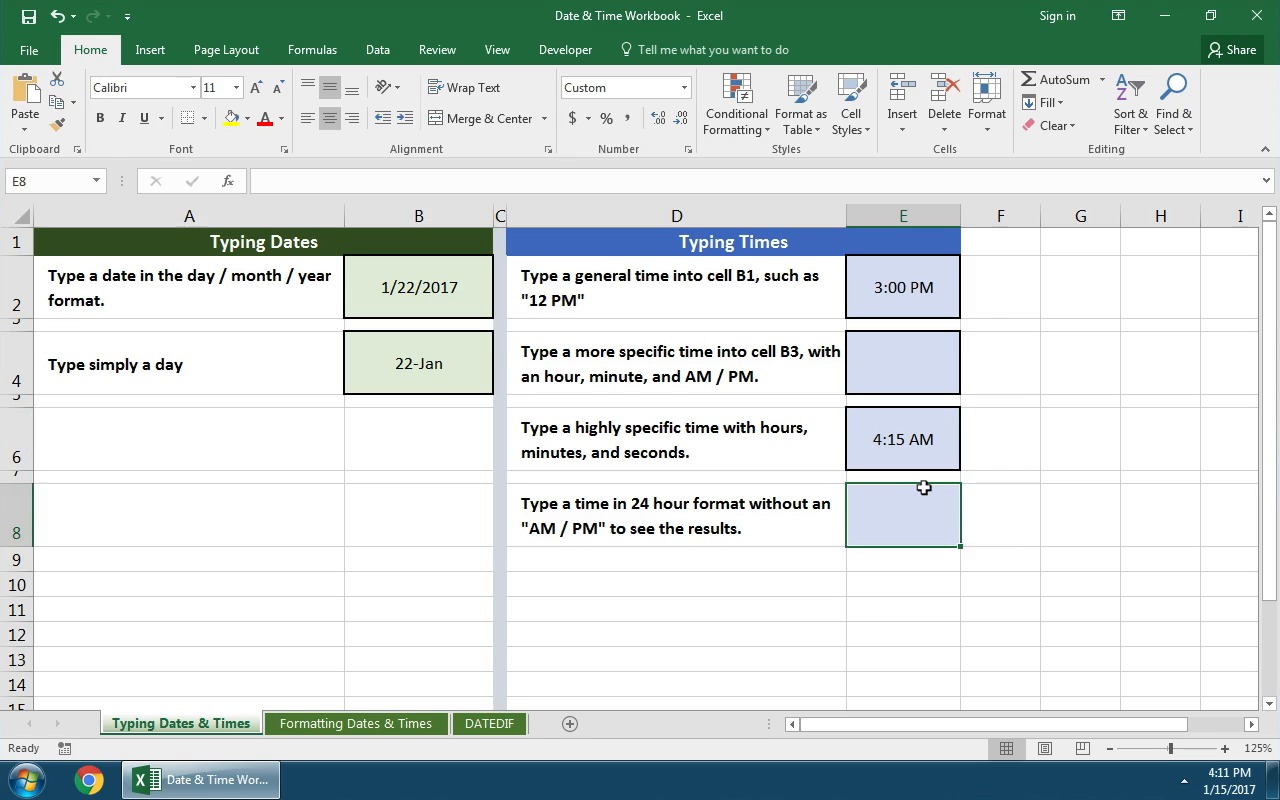
Typing Dates and Times in Excel
For this part of the tutorial, use the tab titled "Typing Dates & Times" in the example workbook.
One of the keys to working with dates and times in Excel is capturing the data correctly. Here's how to type dates and times in your Excel spreadsheets:
1. How to Type Dates
I recommend typing dates in the same format that your system uses. For our American readers, a full date would be in the "day/month/year" format. European style dates are "month/day/year."


When I'm typing dates, I always type in the full date with the month, day and year. If I only want to show the month and the year, I'll simply format it that way (more on that in a minute.)
2. How to Type Times
It's easy to type times in Excel. We can specify anything from just an hour of the day, to the exact second that something took place.
If I wanted to log the time as 4PM, I'd type "4 pm" into a cell in Excel and then press enter:


Notice once we press enter, Excel converts what we've typed into a hours : minutes: seconds data format.
Here's how to log a more specific time in your spreadsheet:


The key is to use colons to separate the section of the time data, and then add a space plus "AM" or "PM."
3. How to Type Date-Time Together
You can also type combinations of dates and times in Excel for highly specific timestamps.
To type a date-time combination, simply use what we've already learned about typing dates, and typing times.


Notice that Excel has converted the time to a 24 hour format when it's used in conjunction with a date, by default. If you want to change the style of this date, keep reading.
Bonus: Excel Keyboard Shortcut for Current Time
One of my favorite Excel keyboard shortcuts inserts the current time into a spreadsheet. I use this formula often, when I'm noting the time I made a change to my data. Try it out:
Control + Shift + ;
Formatting Dates in Excel
For this part of the tutorial, use the tab titled "Formatting Dates & Times" in the example workbook.
What can you do when your dates are European style dates? That is, they're in a day-month-year format, and you need to convert them to the more familiar month-day-year format?

In the screenshot above, what might surprise you is that all six of those cells contain exactly the same data - "1/22/2017." What differs is how they're formatted in Excel. The original data is identical, but it can be formatted to show in a variety of ways.
In most cases, it's better to use formatting to modify the style of our dates. We don't need to modify the data itself - just change how it's presented.
Format Excel Cells
To change the appearance of our date and time data, make sure that you're working on the Home tab of Excel. On the Ribbon (menu at the top of Excel), find the section labeled Number.
There's a small arrow in the lower right corner of the section. Click it to open the Format Cells menu.


The Format Cells menu has a variety of options for styling your dates and times. You could turn "1/22/2017" into "Sunday, January 22nd" with just formatting. Then, you could grab the format painter and change all of your cell styles.


Spend some time exploring this menu and trying out the different styles for your Excel dates and times.
Get Data From Dates and Times
Let's say that we have a list of data that has very specific dates and times, and we want to get simpler versions of those formulas. Maybe we have a list of exact transaction dates, but we want to work with them at a higher level, grouping them by year or month.
You can get the year from a date with this Excel formula:
=YEAR(CELL)


To get just the month from a date cell, use the following Excel formula:
=MON(CELL)


Find the Difference Between Dates and Times
For this part of the tutorial, use the tab titled "DATEDIF" in the example workbook.
While formats are used to change how dates and times are presented, formulas in Excel are used to modify, calculate, or work with dates and times programatically.
The DATEDIF formula is powerful for calculating differences between days. Give the formula two dates and and it will return the number of days, months, and years between two dates. Let's look at how to use it.
1. Days Between Dates
This Excel date formula will calculate the number of days between two dates:
=DATEDIF(A1,B1,"d")
The formula takes two cells, separated by commas, and then uses a "d" to calculate the difference in days.


Here are some ideas for how you could use this Excel date formula to your advantage:
- Calculate the difference between today and your birthday to start a birthday countdown
- Use a DATEDIF to calculate the difference between two dates and divide your stock portfolio's growth by the number of days to calculate the growth (or loss!) per day
2. Months Between Dates
DATEDIF also calculates the number of months between two dates. This date formula in Excel is very similar, but substitutes an "m" for "d" to calculate the difference in months:
=DATEDIF(A1,B1,"m")
However, there's a quirk in the way Excel applies DATEDIF: it calculates whole months between dates. See the screenshot below.


To me, there are three months between January 1st and March 31st (all of January, all of February, and almost all of March.) However, because Excel uses whole months, it only considers January and February as completed, whole months, so the result is "2."
Here's my preferred way to calculate the number of months between two dates. We'll find the date difference in days, and then divide it by the average number of days in a month - 30.42 .
=(DATEDIF(A1,B1,"d")/30.42)
Let's apply our modified DATEDIF to two dates:


Much better. The output of 2.99 is very close to 3 full months, and this will be much more useful in future formulas.
The official Excel documentation has a complex method to calculate months between dates, but this is a simple and easy way to get it pretty close. Writing a good Excel formula is about finding the sweet spot of precision and simplicity, and this formula does both.
3. Years Between Dates
Finally, let's calculate the number of years between two dates. The official way to calculate years between dates is with the following formula:
=DATEDIF(A1,B1,"y")
Notice that this is the same as our past DATEDIF formulas, but we've simply substituted the last part of the formula with "y" to calculate the number of years between two dates. Let's see it in action:


Notice that this works like the DATEDIF for months: it counts only full years that have passed. I'd rather include partial years passing as well. Here's a better DATEDIF for years:
=(DATEDIF(A1,B2,"d")/365)
Basically, we're just getting the date difference in days, and then dividing it by 365 to calculate it as a year. Here's the results:


DATEDIF is extremely powerful, but watch out for how it works: it's going to only calculate full months or years that have passed by default. Use my modified versions for more precision in the results.
Bonus: Work Days Between Dates
The Excel date formulas covered above focus on the number of business days between dates. However, it's sometimes helpful to just calculate the number of workdays (basically weekdays) between two dates.
In this case, we'll use =NETWORKDAYS to calculate the number of workdays between two dates.
=NETWORKDAYS(A1,B1)
In the screenshot below, I show an example of using NETWORKDAYS. You can see the calendar showing how the formula calculated a result of "4."


If you have known holidays in the timeframe that you want to exclude, check out the official NETWORKDAYS documentation.
Recap and Keep Learning
Dates and times are ubiquitous to spreadsheets. Excel date formulas and formatting options are helpful. The techniques in this tutorial can take your Excel skills to the next level so that you can incorporate date-driven data seamlessly into your spreadsheets.
You've added one skill to your Excel toolbox - why stop here? Chain Excel formulas and skills to create powerful spreadsheets. To keep learning more about working with Excel spreadsheets, check out these other resources:
- IF Statements are logic built into your spreadsheet that show results based on conditions. You could combine an IF Statement with a date range to show data based on a date or time. Check out this tutorial to learn them.
- You could combine the VLOOKUP tutorial with date and time formulas to match values based on a date or time.
- Find and Remove Duplicates is an Excel function used in combination with date and time data, as it's often one of the best bits of data to check for duplicates.
How do you work with calendar and time data in your Excel spreadsheets? Are there are any Excel date or time formulas that I'm missing from this tutorial that you use regularly? If so, let me know in the comments.
 By
By


