

Most people think of Microsoft Excel as a spreadsheet application. While Excel is used to modify and build spreadsheets, its killer feature is the ability to automate working with data.
One key skill for working with data is joining cells, also known as concatenation. Let's take a look at how to concatenate data in Microsoft Excel.
What Does It Mean to Concatenate?
Let's say that you have a customer's first name in column C, and their last name in column D. You want column E to contain their full name altogether, but it's just too time consuming to retype it in each cell.
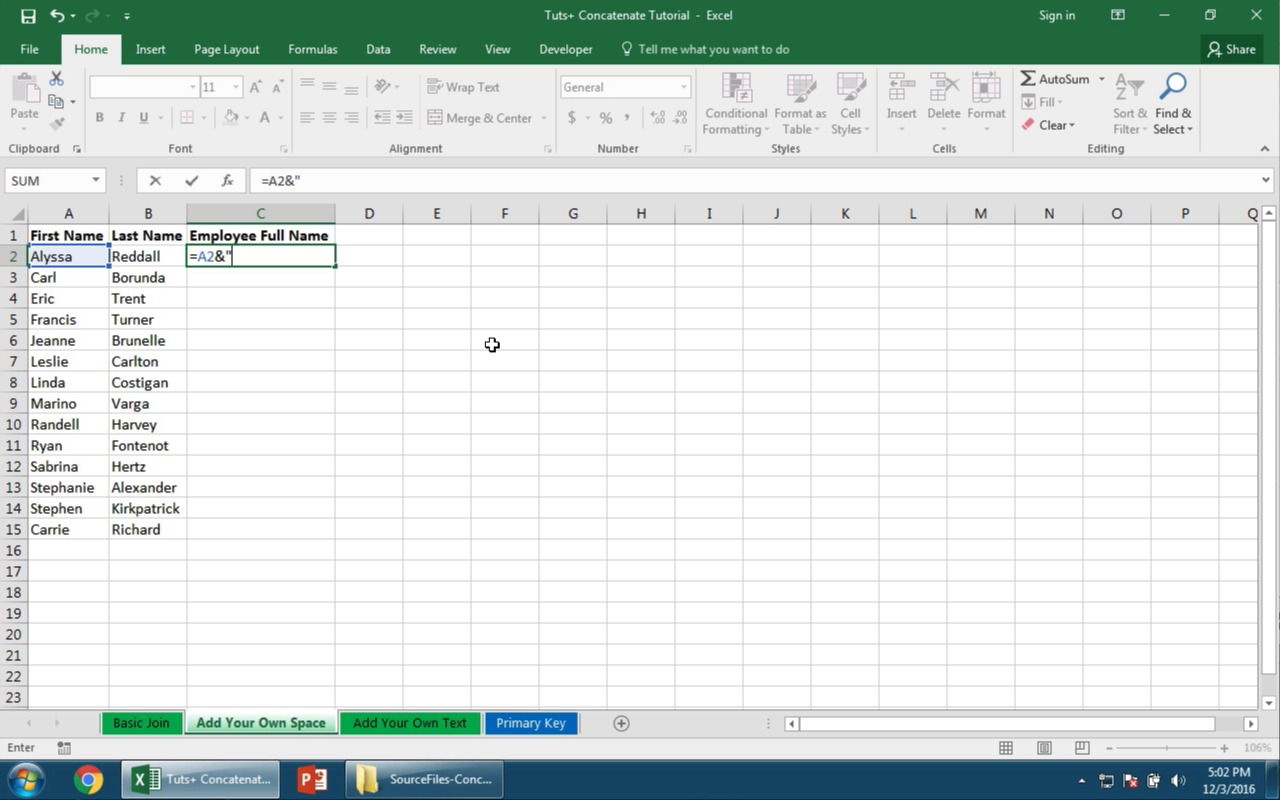
In the screenshot below, I'm working with employee data. I have the first and last names in separate columns, but the goal is to create their full name in column E.

Luckily, Excel will do this automatically for us. This technique is called concatenation, and it basically means joining cells.
In the screenshot above, I use a simple concatenate to join the employee names with a space in between to create their full name. Continue on to find out how to do this:
How to Concatenate in Excel (Watch and Learn)
Watch this quick video screencast below for some ideas on how to use concatenation to join text strings and data. Make sure and download the free Excel workbook included with this tutorial. Then, read on for more tips on concatenation in Microsoft Excel.
3 Ways to Join Text in Excel
Excel usually offers us several ways to do the same thing, and joining cells is no exception. There's an easy way to do this, but I think it's important to know all of the formulas to understand a spreadsheet you inherit or take over for someone else.
1. CONCATENATE
Use with Excel 2013 and older.
=CONCATENATE(A1,A2,A3)
You can use the formula CONCATENATE to join cells. Use commas to separate various cells or fields to join. However, if you use Excel 2016, you might want to consider using the most up to date version of the formula, up next.
2. CONCAT
Use with Excel 2016 and Excel Mobile.
=CONCAT(A1,A2,A3)
In Excel 2016, Microsoft deprecated the CONCATENATE formula and replaced it with CONCAT. The usage is exactly the same, but Microsoft shortened the formula. (Who could blame them? I frequently misspell "concatenate.")
If you open a spreadsheet in Excel 2013 or older, it still works correctly in Excel. In time, you might want to upgrade your formulas to CONCAT instead, but there's actually a third way to join cells that I recommend over either formula. Let's move on.
3. "&"
Recommended way to join text.
=A1&A2&A3
Microsoft recommends using a simple & operator as the way to join cells. It's certainly easier than typing either of the two other formulas. Simply put an "&" between cell references to join them into a new string.
However, it can be a bit difficult to read a formula with an "&" between every cell or bit of text in the formula. I could see using CONCAT as a way to keep the formula a bit cleaner. Either formula is great for joining.
3 Practice Excel Joining Exercises
For all of these examples, I'm going use the recommend & operator to join text. Let's walk through some examples.
For these exercises, I'd recommend using the Excel workbook I built for the tutorial. If you missed it earlier, make sure to download the free Excel workbook to work from and follow along.
Exercise 1. A Basic Join in Excel
Use the tab titled Basic Join in the Excel workbook included with this tutorial.
Let's start off with a simple example for joining text. In this example, I'm going to combine two simple words to make a compound word, like "barn" and "yard" to make barnyard.
To do this, we'll use the simplest possible approach. To combine the text in A2 and B2, I'll write this formula in cell C2:
=A2&B2

Excel will combine the text in cells A2 and B2 and output a finished, compound word in C2. I can just drag the formula down to extend it to all other cells and combine all of the data in columns A and B.
Exercise 2. Adding a Space in The Join
Use the tab titled Add Your Own Space in the Excel workbook included with this tutorial.
Earlier, I showed a classic example for concatenation: joining first and last names to create a full name. This is the perfect time to concatenate because retyping all of those names is cumbersome and a waste of time.
However, we need to adjust the formula slightly. If we joined my first and last name, it would show as "AndrewChildress." We need to work a space into our formula to separate the names. Let's look at how:
In the example below, I'm going to join cells C2 and D2 (the leftmost columns in the screenshot). But we also need a space between the first and last name to properly space it.
We can use quotation marks to add our own text to a concatenate. Just use another "&" symbol, and then add a space inside of it to split the names. See the screenshot below for an example:

The quotation marks with a single space between it split the first and last names to create the full name. My final formula was:
=C2&" "&D2
Exercise 3. Adding Your Own Text
Use the tab titled Add Your Own Text in the Excel workbook included with this tutorial.
Now, let's add our own text when joining text. It works just like adding a space, so we'll need to put the text in quotations.
In the data below, I've got a list of destinations on column A. I want column B to have a message that says "I've been to" and then the name of the city in column A. The problem is, I don't have "I've been to" in my spreadsheet, so I'll manually type it in the formula.
The screenshot below shows the formula I wrote to join the city name with my greeting message.

Don't forget to add another text string after it with a period to write a proper sentence! I wrote a text string in quotes - ("I've been to ") and then joined A2, and then joined a period in quotes at the end.
My final formula was:
="I've been to "&A2&"."
Advanced Excel: Creating a Primary Key
Let's dive into a deeper, more theoretical concept in our Excel spreadsheet. If your spreadsheet is a database with important info, every record (row) in your database should have a primary key.
A primary key helps you uniquely identify a row and ensure that it's not exactly the same as any other. A key use for this would be in customer order data. It's important that we generate a primary key to make sure we don't have any duplicate records in our order list.

The problem is: how do we know if we have any duplicates? We need to generate a primary key to uniquely identify our transactions.
Here's why a single column isn't good enough to use as a primary key:
- We can't use the customer name to uniquely identify a transaction. What if we have two customers named "Bob Smith?"
- We can't use the order time as a unique identifier either. Two orders could happen at exactly the same time on a large marketplace.
- Even the items that a custom order or their shipping address could appear multiple times in your database.
Basically, none of the columns I mention above are good enough to uniquely identify. But, if we join several columns together, we increase the chance that the value is totally unique.
In the example I shared above, here's a suggestion for how I would concatenate the columns to create a primary key. Basically, all I'm doing is joining all of the columns together:
=A2&B2&C2&D2&E2&F2&G2
The result looks like a jumbled mess of characters in column H. However, this is exactly what we need.

Basically, each transaction now has a unique identifier. We've removed any conflicts in name or email address or shipping address by joining multiple columns together.
From here, you could run a Remove Duplicates on column H to scrub any conflicting order records. You can now also use a VLOOKUP efficiently because each row is unique.
There are many uses for creating a primary key. The important use for it is adding data integrity to your records by making each transaction or row unique.
Recap and Keep Learning
CONCAT or "&" are seemingly simple formulas in Excel, but they are much more useful than they first appear. Whether you're joining simple data into complex strings or building a primary key for data integrity, I think this is an essential skill to learn.
- Our tutorial How to Find and Remove Duplicates is another Excel tutorial that focuses on automating the mundane work of cleaning up data.
- The official Microsoft documentation on CONCAT and CONCATENATE is worth checking out for an authoritative source on the best way to join text and cells.
- I opened this tutorial by talking about Excel as an automation tool. VLOOKUP is another formula that automates working with data and bypasses retyping data, and we also have a tutorial on how to use VLOOKUP.
Can you think of other uses for this formula to share with Envato Tuts+ readers? Leave a comment below to share your knowledge or raise a good question.
 By
By


