

A landing page is a useful marketing tool that makes it easy to promote a specific product or service and increase the chances of visitors signing up or purchasing it. They can be used to promote free lead magnets as well as paid offers such as courses, digital or physical products, and services.
An easy way to create a landing page, even if you've got no design experience, is to use an HTML landing page template. In this post, we’ll discuss why you should consider using HTML landing page templates, what makes a great landing page, and walk you through the process of how to design a landing page using a template.
Why Use HTML Landing Page Templates?
While there are several ways to create landing pages for your marketing campaigns, an HTML landing page template is the easiest way. Here are several reasons why you should consider using an HTML landing page template such as those available from Envato Elements.
1. Ease of Use
HTML landing page templates are easy to use because they don’t require you to learn how to code in order to use them. All the elements are already in place so all you have to do is edit the contents. There's no complicated installation process involved as all you've got to do is upload them to the hosting server.
2. Faster Loading Times
When you design a website or a landing page, you’ll benefit from faster loading times than if you designed your website with a content management system. This is because HTML templates have a simpler structure and fewer files overall than themes and templates used for content management systems.
3. No Maintenance Required
Lastly, HTML templates don’t require you to keep an eye out for updates. Once you create the landing page, you can easily create a backup of it once and re-upload it if needed. Unlike content management systems where you've got to continually back up your site and install regular software updates, HTML templates consist of static files that only need updating if you decide to change the content or the style.
Key Elements of a Great Landing Page
Now that we’ve covered the benefits of HTML landing page templates, let’s go over the key elements of a great landing page. This will help you edit the template to your needs and structure it in a logical manner.
1. Great Headline and Subheadline
The first element on your landing page is your headline and copy. The headline should pique interest in anyone who visits your landing page. The subheadline, on the other hand, should encourage them to continue scrolling down and read the rest of your copy as well as to click the call-to-action button and transition from visitors into leads, clients, or customers.
2. Pain Points
Your copy, and ideally, your first paragraph should reference or identify your visitor’s pain points. By doing so, you’re telling them you know what their problem is, which makes them feel understood and allows them to relate to you.
3. Offer Benefits
Your HTML landing page should also address the benefits of your offer. Your visitors don’t care about the features of your product, rather they're more interested in how what you offer can help make their life better. By focusing on the benefits you’ll position your product or service as the perfect solution for their problem, which makes them more inclined to buy.
4. Trust Signals
Your landing page also needs to address the visitor objections, which would prevent them from converting into buyers or subscribers. Aside from your copy, you can address objections by using trust signals. These can include:
- testimonials from existing subscribers or customers
- trust badges such as VeriSign, Norton, Safe Payment, and more
- money-back guarantee
- FAQ section that answers any additional questions
- logos of sites you or your product have been featured on
5. Call-to-Action
The last element on your page should be a call-to-action that tells the visitors what the next step is. Ideally, your call-to-action will be highly visible in contrasting color and you can include it multiple times on the page to give visitors several chances to convert.
How to Set Up a Landing Page Template
Setting up your landing page template isn't difficult, but before we dive into that it’s worth taking a moment to familiarize yourself with the structure of HTML templates and how they work. Here's some steps to follow to refresh your understanding of landing page design:
How HTML Templates Work
HTML templates usually consist of two types of files:
- HTML files
- CSS files.
The HTML files contain the basic structure of all the elements on the page. They're like the frame of your house and it’s these files that you’ll spend most of your time working with. Those files are where you'll change the contents and add or remove sections.
The CSS files control how your landing page looks. They're like the paint that you put on the walls of your house. Using the CSS files, you’ll tweak the colors and the fonts that the template uses.
In some cases your template will also contain JavaScript files, which are usually used for form validation or to add animation effects to your template.
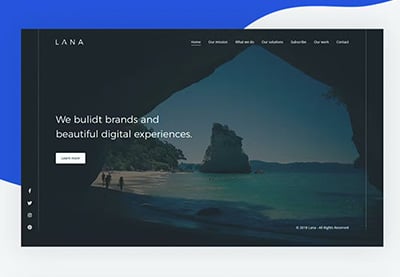
With that out of the way, let’s take a look at how a typical HTML template is structured. For the purposes of this tutorial I’ll be using the Spot HTML landing page template from Envato Elements, so your template files may not be entirely the same. In most cases, you'll have the CSS files, images, and JavaScript folders. You might also see more or fewer HTML files, and in some cases, you'll find a PHP folder that adds extra functionality to the template.


Here’s how the Spot template is organized:
- CSS. This folder contains all the stylesheets that the template uses.
- Images. In this folder, you’ll find all the placeholder images used in the template
- JavaScript. In this folder, you’ll find all the JavaScript files that control various animations and transition effects.
- PHP. This contains the PHP code needed for the contact form
- Video. This contains the sample video used for the demo layout that uses background video.


Aside from the folders above, the Spot template has several HTML files, all of which represent different layout variations.
How to Work With the HTML Landing Page Template
The easiest way to start editing and customizing your landing page template is to see where the code you need to edit is located. To do that, double-click the index1.html file or any HTML file in your template’s folder that’s named index.html. This file usually signifies the homepage and that’s what we'll be editing first.
Once you double-click the file, it'll open up in your default browser. You can also right-click on the file and select Open With and then choose your default Internet browser.
Let’s see where the header is located in the HTML file so we can immediately edit it. Right click on the heading that reads “Spot is the best way to present your app to the world!” and select Inspect.
A panel will load at the bottom. This panel is the Chrome’s Developer Tools panel and it consists of two parts: the left side which shows the HTML code and the right side which shows the CSS code or the styles associated with the element you’re inspecting:


The heading we’re inspecting is nested between <h2> tags. Now, we need to find this part of the code in the template and edit it.
To do this, go back to the template folder and right-click on the index1.html again. Choose Open with and this time select a text editor like Notepad.
Your template will open and you'll be able to see all the code that's used to create your landing page. Scroll down and find the same piece of code that you saw while you were inspecting the heading in your browser.
In my case, this line of code is located on line 106.
Now, you can begin editing the contents. Select the text in between the <h2> tags and delete it. Then, enter your own text:


Now, go back to your browsers, right-click on the button that says Purchase Now and select Inspect. Once you find the piece of code that contains the button text, go back to the text editor, locate the piece of code, and edit the button text.
You can simply repeat these steps again and again until you've replaced all the demo content with your own.
When you’re done making changes, click on Save and then refresh the template tab in your browser window.
Now, let’s take a look at how to replace an image with your own. You can then reuse the same steps to replace all of the images used in the template:


First, gather all your images and place them in the images folder. Then, head back to your browser, right-click on the image in the header area and click Inspect. As you can see from the screenshot below, you’ll notice that the background image for the header is set through the CSS file. The Inspector tab even tells you which CSS file you need to edit:


To edit it, go to your template’s folder, open the CSS folder, and then open the proper CSS file. In this example, I need to edit the color-palette-blue.css. I need to edit line 66 in the file. To do this, I've deleted everything after /images/ and replaced the image name with my own image. Save the CSS file, then refresh your browser window, and you'll see your new background image:


How to Style the Template
When you’re done modifying the contents and replacing the demo information, you need to style the template to match your brand. The Spot template comes with several pre-made color schemes, which are saved as separate CSS files in the colors folder that’s located in the CSS folder. This makes it easy to adjust all the colors at once without editing the CSS files.
You can simply change the way your template looks by replacing the stylesheet in the head of the document with the name of your preferred stylesheet. You’ll want to open your index1.html file in the text editor and locate the line of code that reads:
<link href="css/colors/color_palette_blue.css" rel="stylesheet" media="screen">
Change the name to your preferred color scheme. In this example, I’ve replaced it with
<link href="css/colors/color_palette_red.css" rel="stylesheet" media="screen">
If none of the color themes are to your liking, you can edit the main.css file and adjust the fonts and the colors manually. Simply inspect the code in your browser window and look at the right side of the screen to see which styles are used. Then, find the line of CSS code and adjust it. For example, you can edit the button color in the CSS file by entering a HEX code of your desired color like so:
background-color: #65b5c1;
How to Upload Your Template to the Server
Once your template is customized and styled, it’s time to upload it to the hosting server. Your hosting company should've provided you with all the necessary details that have your FTP username and password.
Start by launching your FTP client such as FileZilla, which is free and cross-platform. Use the QuickConnect bar to enter your FTP username and password and then click Connect.
Find the folder with your HTML landing page template on the left side of the screen. Select all of the files and folders in, drag them over to the right-hand side of the screen, and drop them into the public_html folder.
Wait for the upload process to finish and your landing page will then be live.
Learn More About Landing Page Design
If you'd like to learn more about landing page design, we've got a number of helpful resources on Envato Tuts+. Here are some tutorials to get you started:

 How to Create a Landing Page in WordPress Quickly


 Landing Page vs. Website Homepage: When Do You Use Which?

 10+ Tips: How to Design High-Converting Landing Pages
The following article lists some of our best templates with great landing page designs that you can download right away:


Get Your Landing Page Up and Running Quickly Using an HTML Template
As you can see, getting your landing page up and running quickly is easy with an HTML template. Start working on yours by visiting Envato Elements and finding the perfect template. You can also find some great landing page designs on ThemeForest. Then, follow our tutorial to set it up and launch your landing page so you can start promoting your offer today.
 By
By


