

Your email inbox always seems full of new messages. Deciding what to do with each message can seem overwhelming. You may even be late responding to an important message because you didn't notice it in all the clutter. MS Outlook rules can help.
If you know how to set up rules in Outlook, you can make sure similar emails are always grouped together. This will help you prioritize your income email and stay organized. You can also use Outlook rules to deal with email message types you receive frequently such as newsletters and announcements. You can even set up a rule to automatically delete certain types of emails.
In this tutorial, we'll answer the question: what is a rule in Outlook? You'll also learn how to create a rule in Outlook and also how to import or export Outlook rules. Finally, we'll explain how you can edit or delete Outlook rules.
Now let's take a closer look at rules in MS Outlook.
What
Are Outlook Rules (and How Are They Used?)
You
may be wondering: what is a rule? A rule
in Microsoft Outlook is a set of actions that Outlook performs automatically
when certain conditions are met. You can define the conditions for a rule using
Outlook’s Manage Rules & Alerts
tool. A rule can be a big timesaver if you often perform the same actions on
similar emails.
Outlook also has a Rules Wizard available to make the process of creating rules even easier. The Rules Wizard has commonly used rules already set up. All you’ve got to do is customize each rule in the wizard with your own choices.
How to Create Rules in MS Outlook Using the Rules Wizard (Video)
In the screencast above learn how to use the Rules Wizard in Microsoft Outlook. Or, read on for comprehensive written
instructions to help you create and modify rules in Outlook.
1. How to Move a Message Into a Folder Using a Rule
By
far the most common rule that people create is one that automatically sends
certain messages to a folder. You can do this quickly and easily from with this
Outlook shortcut. The shortcut also includes a few other common actions.
Start
with your email inbox open. Select the message you want to automatically move
into a folder by clicking on it. Click Home
> Rules. Select Create Rule
from the drop-down menu. The Create Rule
dialog box appears:
.jpg)
Notice the top of the dialog box is already filled out with the From, Subject, and To fields from your selected email. To select one or more of these conditions as is, simply check in the check box to the left of them. You can also type in a new subject and/or select a new email recipient (if you’ve got a lot of emails going to your inbox).
In the bottom section, you can select up to three actions to perform on an email that meets the defined criteria.
- Display the email in a New Item Alert window on your desktop.
- Play a sound when an email meeting the criteria is received.
- Move the item to a folder you select
2. How to Use the Rules Wizard
If you need more options for your MS Outlook rule, use the Rules Wizard. Let’s get started:
Step 1. Access the Rules Wizard
Start with your open email inbox. Click the File tab. The Account Information window displays:
.jpg)
Click the Manage Rules & Alerts box to access the Rules and Alerts dialog box:
.jpg)
Click
the New Rule menu option in the
upper left of the dialog box. The Rules
Wizard appears:
.jpg)
Note: You can also access the Rules Wizard from Advanced Option of the Create Rule dialog box.
Step 2. Choose a Template From the Outlook Rules Wizard
At the top of the Rules Wizard, you’ll see a list of pre-defined rule templates in two categories:
- Stay Organized
- Stay Up to Date
You’ll also see the category Start from a blank rule. You would use this category to create a rule if you didn't want to start with one of the pre-defined templates.
Review the existing rule template list and click on the one that meets your needs to select it. Then click the Next button. For the purposes of this tutorial, I’ve selected the “Move messages from someone to a folder” template. If you select a different template, your choices may vary.
Step 3. Customize the Rule Conditions
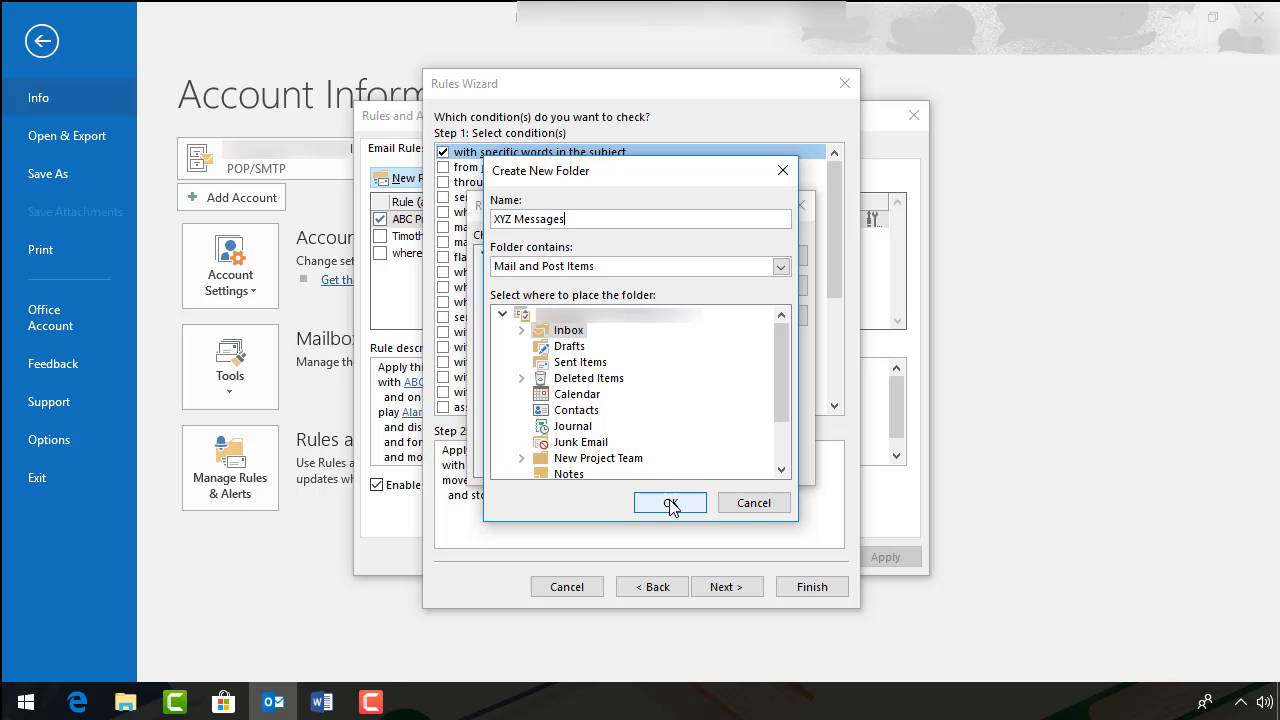
After you select a rules template, the Rules Wizard displays a list of conditions to apply to the template with a check box by each condition:
.jpg)
Check the box next to each condition you want to apply to the rule. The conditions you’ve selected appear in the box under Step 2 in the Rules Wizard. Note the hyperlinks in each condition. Click on each hyperlink to customize the rule with your own requirements. Here’s an example of what appears when I click the importance hyperlink:
.jpg)
Continuing clicking on each hyperlink to make the condition specific to your needs. When you’ve finished, click the Next button.
Step 4. Customize the Rule Actions
Once you’ve customized the rule conditions you’re ready to customize the rule actions. The Rules Wizard displays various actions you can apply to this rule:
.jpg)
This screen works like the earlier Rules Wizard screen. Select actions you want to add to this rule by checking the check box next to each selected action. Click the hyperlink in the Step 2 segment of the screen to make the action more specific. When you’re done making your selections, click the Next button to move to the next screen in the Rules Wizard.
Step 5. Set Up Exceptions to the Rule
The
next Rules Wizard screen is very
similar to the previous two, except in this case you’re defining any exceptions
to the rule. When you’ve finished defining rule exceptions, click the Next button again.
Step
6. Name the Rule and Turn It On
In
the final Rules Wizard screen, you’re prompted to name the rule:
.jpg)
Type the rule name in the indicated space. If you want to run the rule on existing messages, check the box next to the first box. To turn the rule on, check the second check box. If you’ve got more than one account, check the third box.
When
you’re finished customizing the rule, click the Finish button. The Rules and
Alerts dialog box appears. Click Apply
and then click OK to activate
the rule.
You’ve
just created a rule in MS Outlook!
4.
How to Import or Export a Rule
Rules
can be imported or exported. This can be especially helpful if you migrate to a
different version of Outlook. I’ve also been able to use this feature to share
Outlook rules between different Outlook users.
Caution: If
the exported rule involves a specific folder or anything else specific to your
email, the Outlook importing the rule must have the same folder.
Let’s get started.
Step 1. Export a Rule
Start
with your open email inbox. Click the File
tab. The Account Information window
displays. Click the Manage Rules &
Alerts box to access the Rules and
Alerts dialog box. Click Options
from the menu at the top of the screen. The Options dialog box appears:
.jpg)
Note: You can also access the Rules and Alerts
dialog box from Rules option
under the Home tab on your ribbon.
Click
the Export Rules button. A File Explorer window opens:
.jpg)
Navigate
to the directory where you want to store your exported rules file. Type the
name of the file you want to store the rules in and the click Save.
Step
2. Import a Rule
The
procedure to import a rule is like the export rule procedure with a few
differences.
Start
with your open email inbox. Click the File
tab. The Account Information window
displays. Click the Manage Rules &
Alerts box to access the Rules and
Alerts dialog box. Click Options
from the menu at the top of the screen.
When
the Options dialog box appears,
click Import Rules instead of Export Rules. When the File Explorer
window opens, navigate to the directory where you’ve got the imported rules
saved. Click on the file name to select it and click Open. Click OK to import
the rule.
Note: If
some of the parameters are missing for an imported rule you’ll get an error
message. An example would be if a folder used by the rule isn’t set up in your
email.
5.
How to Edit a Rule
Suppose you’ve got a rule set up for how to handle a certain type of email in Outlook, but you need to change the rule. With Outlook, you can easily edit an existing rule to change it. Here’s how:
Step
1. Open the Rules and Alerts Dialog Box
Start with your inbox open. Click the File > Manage Rules & Alerts. The Rules and Alerts dialog box opens:
.jpg)
Select
a rule from the list. Click the Change
Rule menu option at the top of the dialog box. The Change Rule pop-up menu appears:
.jpg)
Note: You can also get to this pop-up menu from Rules > Manage Rules & Alerts > Change rule on the Home tab in your Outlook inbox.
From
this menu you’ve got three choices:
- edit more than one rule setting at a time
- quickly rename the rule
quickly add or change a single rule action
Let’s
look at each of these options separately.
Step
2. Edit Multiple Rule Settings
To
edit more than one rule setting, click the Edit
Rule Settings option on the Change
Rule pop-up menu. The system re-opens the Rules Wizard for the selected rule. Use the Rules Wizard to make changes to the conditions, actions, and
exceptions.
Step
3. Quickly Rename the Rule
If all you want to do is rename the selected rule, there’s no need to re-open the Rules Wizard. Instead, select the Rename Rule option from the Change Rule pop-up menu. The system prompts you to type in the new name for the selected rule:
.jpg)
When
you’ve finished typing the rule name, click the OK button.
Step
4. Add or Change One or More Rule Actions
There’s also no need to re-open the Rules Wizard if all you
want to do is change a few common actions. The Change
Rule pop-up menu has some shortcuts for common actions beneath the Rename Rule option:
Active actions appear with a blue box around the action icon in the pop-up menu. To turn a single action on or off for the selected rule, simply click on it.
For some actions, that’s all you need to do. For other actions a second dialog box displays when you add that action. The second dialog box lets you provide more specific information.
For example, If you click the Copy to Folder option a dialog box appears so that you can select
the correct folder:
.jpg)
When you’ve finished making changes to the selected rule, click OK on the Rules and Alerts dialog box.
6. How to Delete a Rule
If
you no longer need a rule, you can delete it. Start with your inbox open. Click
the File > Manage Rules & Alerts.
The Rules and Alerts dialog box
opens:
.jpg)
Note: You can
also get to the Rules and Alerts
dialog box from Rules > Manage Rules
& Alerts on the Home tab in
your Outlook inbox.
Select the rule you want to delete by clicking the checkbox next to it. Then, click the Delete option (it looks like an X) on the menu towards the top of the Rules and Alerts dialog box. A prompt appears asking if you really want to: Delete rule [Rule Name]. Click Yes, then click the OK button at the bottom of the Rules and Alerts window.
Learn More About Outlook
Study the tutorials below to learn more about MS Outlook:
.jpg) How to Organize Your Outlook Contacts
How to Organize Your Outlook Contacts
.jpg) How to Compose & Send New Emails With Microsoft Outlook
How to Compose & Send New Emails With Microsoft Outlook.jpg) How to Organize Your Outlook Email Inbox Efficiently
How to Organize Your Outlook Email Inbox Efficiently
More Helpful Email Tips and Strategies
Conclusion
Keep your inbox messages organized using Outlook rules. You can automatically sort messages into the appropriate folders by setting up rules in Outlook. Now that you know how to use Outlook rules, your messages will always be handled properly and your inbox will be organized.
 By
By


