


Emails are a big part of most of our personal and professional lives. According to statistics from market research firm the Radicati Group, there are over 2.6 billion email users in the world. You're probably one of them.
You've got many choices for email services. One popular email software is Microsoft Outlook. If you're just getting started with Outlook and you've never used it before, you may wonder how to send an email.
Whether you're new to using Outlook or just need a refresher, this tutorial can help. In it you'll learn how to compose an email and send it. We'll also cover some email basics like message formatting and how to attach files to an email.
Now let's dig into the material on how to compose an email with Outlook.
How to Compose an Email With Outlook (Video)
In the screencast above learn how to compose an email in MS Outlook and send it. Or, read on for comprehensive written instructions to help you create your first email message.
Step 1. Open Microsoft Outlook
Before you can learn how to send an email using Outlook, you first need to open it.
So, open Microsoft Outlook on your desktop. In most cases, this means clicking on the Outlook icon. Microsoft Outlook opens:
.jpg)
Important: Microsoft has several current versions of Outlook available. Your screen appearance and functionality could very slightly depending on which version you are using and how it is configured.
You'll notice that Outlook automatically opens to your Inbox. Since this is a new Outlook account, we don't have many incoming email messages.
Also note that the main portion of the menu options below the tab options is called the Ribbon.
Step 2. Create a New Outlook Message
The next step in sending your first message with MS Outlook is to learn how to create a new email.
To create a new Microsoft Outlook email message, click the New Email option on the far left of the Microsoft Outlook Ribbon under the Home tab. The New Messages window appears in the MS Outlook Message tab:
.jpg)
Step 3. Fill Out the Header Information
The first thing you'll need to fill out on the New Messages window is the email header information. This consists of the following fields:
- From Drop-down. This field contains the email address you're sending the email message from. (Note: If your Outlook account is only attached to one email account, this field won't appear.)
- To. The To field contains the email address or addresses you're sending the email message to.
- Cc. In this field you can include additional email recipients.
- Subject. The Subject field contains a brief description of your email topic.
1. How to Fill Out the Email Header Info (To, From, and Subject)
To start, make sure the information in the From field is correct. This field defaults to the current email address you're using with Microsoft Outlook. If you use more than one email address with Microsoft Outlook, you'll see a down arrow to the right of the word From. This arrow allows you to switch the From field to another email address if you click on it. Here's what happens when you click the down arrow:
.jpg)
Next, you want to identify who you're sending the email message to using the To field. You can do this is one of two ways:
- Type the email address in the field. If there's more than one email address, use a comma to separate them.
- Click the To field to search your email contacts. Select the contacts you want to send the message to from the Select Names: Contacts dialog box.
Here's a look at the Select Names: Contacts dialog box:
.jpg)
You also need to complete the Subject field before you send your email message. In this field, type a short description of what the email is about. The tutorial below discusses email subject lines, but many of the principles apply to other emails as well:

2. How to Copy Someone on MS Outlook (Cc, Bcc)
You don't have to copy anyone on your email message to send it, but MS Outlook gives you the option to copy or blind copy additional recipients if you want to.
Contacts who are copied (Cc) on an email message are typically not expected to respond. They're receiving the message for informational purposes only. For example, you may copy your boss on an important memo.
Contacts who are blind-copied (Bcc) on an email message aren't visible to others who receive the message. They're also not expected to respond. You may want to use this option if you need to keep a recipient's email information private.
To copy recipients on your email, either type their email addresses in the Cc field or click the Cc field to select the contacts from the Select Names: Contacts dialog box.
.jpg)
Also, you can use the Select Names: Contacts dialog box to specify the recipients are being blind-copied on the message. Instead of clicking the To or Cc field on the dialog box, use the Bcc field.
Step 4. Compose a New Message With MS Outlook
Once you've filled out the email header information, you're ready to learn how to compose an email. This is the content of your message.
Simply type the message in the box below the header information:
.jpg)
For advice on how to write an effective email, review these tutorials:
 How to Properly Write a Formal Email That Gets Results (+ Video)
 How to Write a More Effective Email (15+ Best Tips & Tricks)
 How to Master Proper Business Email Format - and Avoid Professional Disaster
Once you've written your message, you're not done. To maximize its effectiveness, you should use some of Outlook's formatting features. Let's take a closer look at those:
1. How to Format Your Message.
Microsoft Outlook supports basic text formatting tools common to other Microsoft products. You can find them on the Ribbon in the Format Text tab:
.jpg)
Here's a summary of some of the Microsoft Outlook formatting features available:
- font
- size
- bold
- italic
- underline
- font color
- align font
- numbered list
- bulleted list
- indent less
- indent more
- quote
- remove formatting
- strike through
- double strike through
- superscript
- subscript
- small caps
- all caps
- hidden
Note: You can also find many of these formatting options on the Message tab in the Formatting section of the ribbon.
To use one of the formatting tools, highlight the text you want to format with your cursor. Then, click the formatting option in the ribbon that you want to apply to the text.
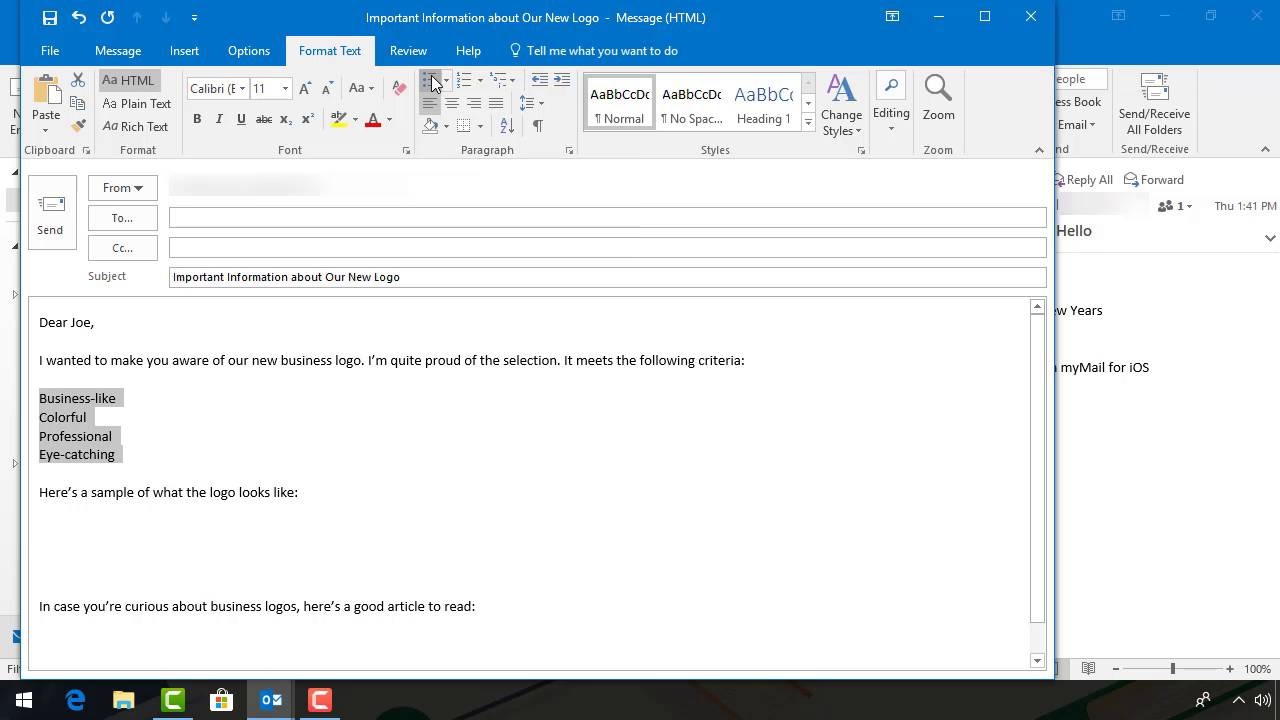
In the example below, I've applied italics and a numbered list to the text:
.jpg)
Caution: Outlook uses HTML to produce most text formatting options. If the person receiving the message is using an email system that only supports Plain Text, they won't be able to see the formatting you applied.
2. How to Remove Text Formatting in Microsoft Outlook
MS Outlook also allows you to remove text formatting quickly and easily. You might want to do this if you need to send a message in Plain Text format. Here's an example:
.jpg)
To remove text formatting, highlight the text you want to unformat and click the Clear All Formatting icon in the Ribbon. The formatting is gone.
3. How to Attach a File or Item to a MS Outlook Email Message
You can easily attach a file or item to your message using the Attach File icon or the Attach Item icon. These icons are found on the Message tab:
.jpg)
Or on the Insert tab you'll find the Attach File icon and the Outlook icon:
.jpg)
To attach a file or item to your message, place your cursor in the message. Click the icon and select the item to be attached from your PC or from the list that appears. The item is attached below the Subject line:
.jpg)
4. How to Insert a Link Into an MS Outlook Email Message
You can also insert a link into your email message from the Insert tab using the Link icon.
Place your cursor in the message where you want to add the link. Click the Link icon. The Insert Hyperlink dialog box displays:
.jpg)
Type the URL of the link you want to include in the Address field. If the text you want to display is different from the URL, type it in the Text to display field. Click OK. The link is inserted into the body of your message:
.jpg)
5. How to Add a Photo to an Outlook Message
You can also add a photo or graphic image into the body of your message from the Insert tab using the Pictures or Online Picture icons. Here's the Insert Picture dialog box:
.jpg)
Another way to insert an image into your Outlook message is through the Online icon (next to the Pictures icon). This icon lets you choose a picture from your computer to insert into your email. The Online icon opens up a Bing image search.
Warning: Many online images are copyrighted. Be sure to check the copyright information on any image before using it.
To add an image, place your cursor in the message where you want the picture to appear. Click the icon and select the image. The selected image appears in your email message:
Caution: Outlook uses HTML to display images in messages. If the person receiving the message is using an email system that only supports Plain Text, they won't be able to see the picture in your message.
Note: The image appears in its original size. Drag the edges of the image to resize it.
The Format tab may automatically open and you can format the image you just added.
6. How to Add a Signature Image
One way to make your email more professional is to add a professional signature template. Professional signature templates are available through Envato Elements and Envato GraphicRiver.
To add a professional signature image from a template, click on the Signature icon from the Message tab. From the drop-down menu, click Signatures. The Signatures and Stationery dialog box appears:
.jpg)
If you've got more than one email account attached to your Microsoft Outlook email, you'll have to use the Select signature to edit field to choose which signature you're editing.
Click in the box below Edit signature and click the Insert Picture icon. Select your picture from the Insert Picture dialog box and click the OK button. The signature will automatically be added to all outgoing emails.
.jpg)
The article below contains some additional information about signature templates:
Step 5. Review Your Message
Once you've finished your message, check it over carefully to make sure there are no mistakes or typos. Mistakes in a business or personal email can make a bad impression. Here are some of the areas you should check:
- Completeness. Does the email say everything it's supposed to? If an action is required, will the recipient understand what to do? Is the purpose of the message clear and easy to understand?
- Tone. It's easy for a reader to misunderstand the tone of your message. If you can, it's a good idea to have a friend or colleague read over the message. Ask them whether the message makes you seem angry or upset. If they feel it does, revise your message.
- Spelling and Grammar. Under the Review tab, there's a Spelling and Grammar icon. Use this checker to look for mistakes, but be aware that checkers sometimes miss word usage mistakes. So, it's a good idea to read over your email as well.
- Accuracy. Are the details in your information correct? Doublecheck the spelling of names of people and things. If there is a phone number or street address, make sure it is right. Pay particular attention to the decimal points in numbers, especially if they involve dollar figures.
- Formatting. Proper formatting can make your email easier to read. Make sure to take advantage of formatting features like bold, italics, numbered or bulleted lists.
- Attachments. If your message is supposed to include attached files, are the files actually attached to the message? If not, attach them now.
Step 6. Send Your Outlook Email Message
Once you've carefully reviewed your message, you're ready to send it. Click the Send button in the upper left of the New Message window. Your message is sent.
If you decide not to send your message, you do have other options. You can:
- Discard a message.
- Save a message as a draft.
Here's instructions on how to do both:
1. How to Save a Message a Draft
To save a message as a draft, go to the File tab. Click the Save option. The unsent message is saved to your Drafts folder.
The next time you open your email, click the Drafts folder. Double-click on your message to open it.
2. How to Discard an Microsoft Outlook Email Message
If you really dislike your unsent message, you can choose not to save it. Simply click the X at the upper right corner of the New Message window to close it. The system prompts: Want to save your changes? Click the No button.
The New Message window closes and your email message draft is discarded.
More Helpful Email Tips and Strategies
Conclusion
Now that you've learned how to send an email with Microsoft Outlook you're ready to start using Outlook. You've also learned some Outlook basics like how to format a message, how to save a message to send later, and how to attach a file to an email message. So, go ahead. Send that first Outlook message today!
 By
By


