You don’t need to be artistic to create art in Excel. All you need is patience and time. Retro pixel graphics have started to make a comeback. If you want to create your own pixel art and create it in Excel, you can.

This article explains what Excel art is and how to create your own Excel artwork. We’ll also look at some information about Excel, explore some common questions and answers, and share Excel tips.
What Is Excel Art?
According to Business Insider, Tatsuo Horiuchi is known for creating amazing Excel art. Horiuchi has discovered that you can make art on Excel instead of using it as just a spreadsheet tool. Horiuchi’s Excel art has been circulating online for years.
Many people create pixel art in Excel. Pixel art is where art is broken down into a basic graphic form and color. This type of art is also most often seen in video games.
How to Create Excel Art
If you’ve seen the art in Excel by Tatsuo Horiuchi, you may be inspired by it and want to create your own. It's possible to create your own pixel art in Excel using a tracing method. All you need to do is follow these steps.
Here’s the tutorial:
1. Choose an Image

Envato Elements has many stock images that you could use. Above is the image that'll be used in this tutorial. It’s from Envato Elements, which is a great source of photos and graphics.
2. Add the Image to the Background

Click on the Page Layout tab above the toolbar to add your image to the background. Next, click on the Background button. Your file finder appears. Choose your image file from the file finder.
3. Adjust the Zoom

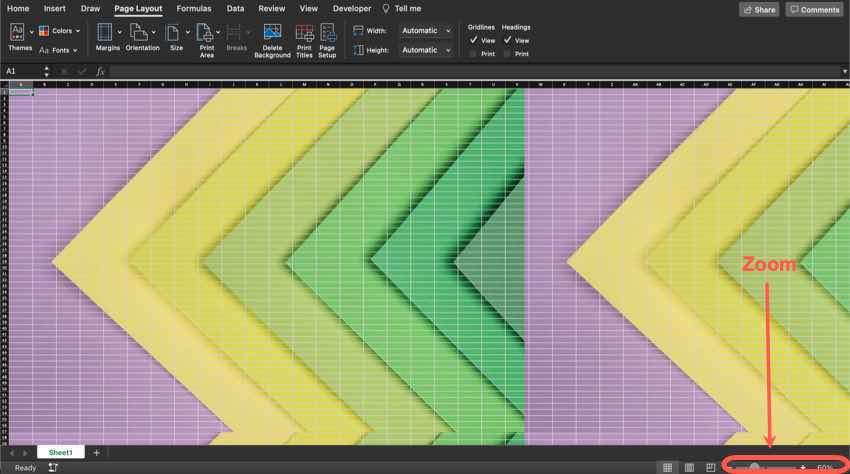
There's a Zoom bar in the lower right corner of your window; adjust the zoom to about 60% percent. This enables you to see the image and cell boxes clearly.
4. Adjust the Columns

Next, you need to adjust the column size. To adjust all the columns, quickly hold down the Command key on your keyboard and each column heading that your picture covers. Next, click on Format in the bar at the very top above your Excel window.

When you click on the Format option, a menu drops down. Click on the Column option. When you choose the column option, a menu appears. Choose Width… from that menu.
When selecting the width, a box appears where you can type the width you want. I’m going to make it 4.50.
You may need to repeat this step to cover your whole image.
5. Fill in the Cells to Trace the Image

You want to trace the image that you've got as the background.
- Click on the cell (s) that you want to start filling in to trace them.
- Click on the Home tab. The toolbar has a Fill Color button. Click on the arrow next to this button.
- A color menu appears. Choose the color you want. (It can be different from the original color.) If you select multiple cells, just click on one cell and hold down your mouse while dragging it down the column or row to select all the cells you want.
6. Delete the Background Image

Click on the Page Layout tab above the toolbar. Next, click on the Delete Background button. Now you’re done. Look what you’ve accomplished creating Excel art.
The Top Source for Digital Assets (With Unlimited Use)
Do you use have a job where you could use digital assets? Try Envato Elements. Digital elements include:
- PowerPoint presentation templates
- images
- fonts
- audio
- website themes
- and more.
When using premium digital elements, you save time. Since you aren’t designing something from scratch, you save time. All the digital elements on Envato Elements are high quality and made by professionals to look stylish.

So, where can you get these digital assets? Envato Elements is the best source for premium digital elements. It's a subscription service where you pay a low monthly fee. Once you become a subscriber, you get unlimited use of the digital elements. This means you can download as many templates or any other elements as you want. That makes Envato Elements a great deal!
Common Excel Questions Answered (FAQ)
You’re looking to have fun in Excel by creating art in Excel. This means that you’re probably familiar with the software. But just because you’ve used the software before doesn’t mean you know everything about it. If you want to learn more, here are some common answers and common questions about Excel:
1. How Can I Make My Excel Spreadsheets Look Nice?
Formatting your Excel spreadsheet can make it look more professional and cleaner. You can also format cells to emphasize important information that you want the viewer to focus on. To learn about how to format your Excel spreadsheet read this tutorial:
2. Can I Move my Excel Spreadsheet to Google Sheets?
Yes, it's possible. Not only is it possible, but it’s easy to do.
Sheets makes it easy to upload your Excel spreadsheet and convert it inside the browser. Here’s a tutorial on how to convert your Excel Spreadsheet into Google Sheets:
3. Can I Style my Excel Cells?
Yes, you can. Styling cells in Excel can make your spreadsheet look more stylish and draw attention to it. Excel has many styles that you can use built into the software. Here’s a tutorial on how to style Excel Cells:
4. How Do I Add More Sheets to my Document?
You can have multiple sheets of data in one document in Excel. This is great if you've got a lot of related data. To learn more about sheets in Excel, read this article:
5. Can I Combine Excel Workbooks?
If you've got different Excel workbooks and want to combine them, you can. It can be helpful to have multiple workbooks together. This article covers how to combine workbooks:
Use Microsoft Like a Pro (Excel Tips)
Even if you use Excel daily, you may not know every tip and trick. Here are some tips and tricks that'll help you use Excel like a pro:
1. Easily Select All
There are two ways that you can easily select all of the cells in your spreadsheet:
- The first is a keyboard shortcut. Press Command + A. All your spreadsheet cells are selected.
- The second way is easy and just requires you to press one button. There's a blank button in the left corner where the column headings and the row heading meet. Press that button to select all the spreadsheet cells.
2. Add Multiple Rows or Columns
Select the number of rows or columns you need to add more than one row column. Next, click on Insert in your computer’s toolbar at the top of your screen. When you click Insert, a menu drops down. Next, click Cells… from the menu that drops down. When a window appears, choose the Entire row or Entire column option, depending on what you want.
3. Quickly Move and Copy Data in Cells
You can quickly move a single column of data in your spreadsheet. First, select the column and move your cursor to the border of the column. Then, when your cursor turns into a hand icon, you can move the column. Then, drag your mouse to where you want the column.
4. Use Wrap Text
Getting all of your text to fit into a cell can be frustrating. Fortunately, there's a button that can make it easy to fix that problem. Click on the Home tab. In the toolbar, click on the Wrap Text button. All the text in your spreadsheet will wrap.
5. Quickly Enter a Sum
You can do that easily if you quickly sum up the data in a column. Just highlight the cells you want to sum. Next, press Shift+ Command+ T on your keyboard. It'll sum up all the data in those cells.
6. Autofill Cells
If you want to autofill cells in Excel is easy. But filling every row in a column can take a long time. To activate autofill, start by typing in the data in several cells. Next, put your cursor in the corner of the cell until you see a cross, then drag your cursor down to fill in all the cells you want. This tip works better if you've got data that’s an obvious pattern, for example, consecutive dates.
7. Save a Chart as a Template
If you need to use the same chart multiple times, it'll save time to have a template of that chart. First, make sure that your chart is exactly how you want it to look, then select the chart. Right-click on the chart. From the menu that appears, select the Save as Template option from the menu. In the Microsoft Excel Templates folder, save the file as a CRTX extension.
8. Hide the Ribbon
If you want to see your whole spreadsheet without distractions like the ribbon, you can easily hide it. To hide the ribbon, press the following keys on your keyboard Option + Command +R. Now you’ve hidden your ribbon.
Why Not Create Art With Excel Today?
Whether you’re bored or want to be creative, you can create pixel art using Excel. If you've got the time and patience, it’s a simple process.
But IF you’re a digital creative or need digital assets often, consider Envato Elements. Sign up for Envato Elements now.


