


If you’re a Microsoft Excel user, chances are you have many spreadsheets full of data. To work efficiently, it’s often useful to merge two Excel spreadsheets together.


Need to merge Excel files? Don't copy and paste the data from each sheet manually! There are many shortcuts that you can use to save time combining workbooks. I'll show you which one is right for each situation. It’s how to merge two Excel spreadsheets with ease.
Jump to content in this section:
3 Methods to Merge Excel Spreadsheets
Excel can be challenging at times because it's so powerful. You know that what you want to do is possible, but you might not know how to accomplish it. In this tutorial, I'll show you several techniques you can use to merge Excel spreadsheets.
1. How to Move & Copy Sheets (Simplest Method)
The easiest method to merge Excel spreadsheets is to copy one sheet from one workbook to another. This way, you can merge two Excel spreadsheets without any complex formatting tasks.
To do this, start off by opening both Excel workbooks. Then, switch to the workbook that you want to copy sheets from.
Now, hold Control (or Command on Mac) on your keyboard. Then, click on all the sheets that you want to copy to a separate workbook. As you do this, notice that the tabs will show as highlighted.
Now, right click-and choose Move or Copy from the menu.
On the Move or Copy window, you'll want to select the workbook that you want to move the sheets to. Choose the name of the file from the To book drop-down.


On the Move or Copy window, you'll want to select the workbook that you want to move the sheets to. Choose the name of the file from the To book drop-down.
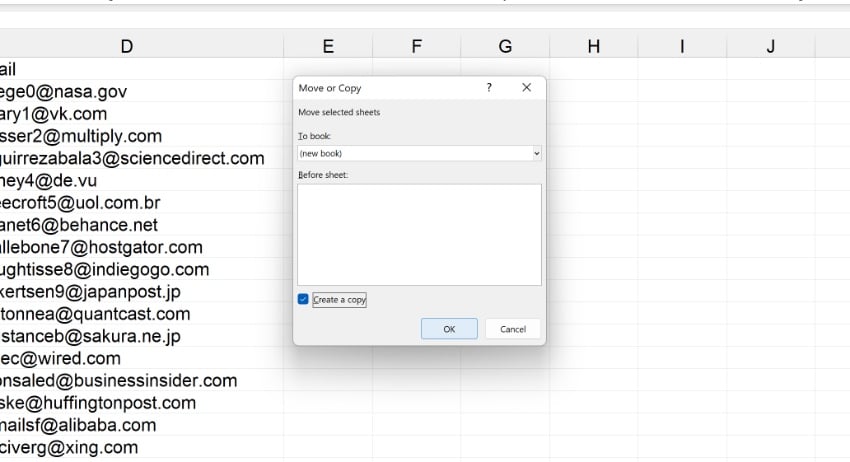


Also, you can choose where the sheets are placed in the new workbook. You can control where they fit in sequence with existing sheets. The Before sheet menu controls where in the workbook the sheets will be inserted. You can always choose (move to end) and re-sequence the order of the sheets later as needed.
Finally, check the box to Create a copy. This copies the sheets and creates a separate copy of them in the workbook you're moving the sheets to.
If you don't check this, the sheets will be removed from the original file and moved to the new one. Once you press OK, you'll see that the sheets we copied are in the combined workbook.
Just like that, you've learned how to combine two Excel spreadsheets by copying sheets! But this approach has a few downsides. If you keep working with two separate files, they aren't "in sync." If you make changes to the original workbook that you copied sheets from, they won't update in the new workbook.
2. Prepare to Use Get & Transform Data Tools to Combine Sheets
Excel has an incredibly powerful set of tools that are often called PowerQuery. Beginning with Excel 2016, this feature set became known as Get & Transform Data.


These tools help you pull data from other workbooks and consolidate it into one workbook. They really unlock the power you need for Excel merging two spreadsheets (or more!)
Before You Start: Check the Data
The most important part of this process is checking your data before you start combining it. The files need to have the same setup for the data structure, with the same columns.
It's tough to combine a four-column spreadsheet and a five-column spreadsheet, for example. By default, Excel won't know where to place the data.


You'll often find yourself needing to combine spreadsheets with downloaded data from systems. In that case, it's worth configuring your data ahead of time. You can set up your system to download data in the same columns each time. By keeping a consistent layout, it makes merging Excel spreadsheets a breeze.
Before downloading data from a service like Google Analytics, make sure you are downloading the same format each time. This ensures that you can easily work with and combine multiple spreadsheets together.
Pulling data from a system like MailChimp, or an ERP like SAP or Oracle that powers huge companies? The best way to save time is to ensure that you're downloading data in a common format.
Now that we've checked our data, it's time to dive into learning how to combine Excel sheets.
3. How to Combine Excel Sheets in a Folder Full of Files
Ever had a folder full of files that you needed to put together into a single, consolidated file? When you've got dozens of files, opening them one-by-one to combine them isn't feasible. Learning this technique can save you dozens of hours on a single project. It's how to merge Excel files with brisk efficiency.
Again, it's crucial that the data is in the same format when merging Excel spreadsheets. It also helps to place all of the files in the same folder so that Excel can easily watch this folder for changes. This way, when you learn how to combine two Excel spreadsheets or more, any changes made will update in real time.


Now, go to the Data tab on Excel’s ribbon. It holds the keys of how to combine two Excel spreadsheets - or more! Click on Get Data > From File > From Folder.
Step 1. Point Excel to the Folder of Files
Here's a key step for how to merge two Excel spreadsheets: find your files! On the pop-up window, you'll want to specify a path to the folder that holds your Excel workbooks.

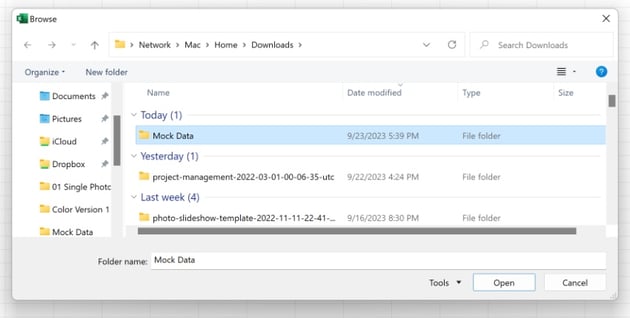

Browse to the folder, click it, then choose Open.
Step 2. Confirm the List of Files
After you show Excel where the workbooks are stored, a new window will pop up that shows the list of files you're set to combine. Right now, you're only seeing metadata about the files, and not the data inside of it.


This window simply shows the files that are going to be combined with our query. You'll see the file name, the type, and the dates accessed and modified. If you're missing a file in this list, confirm that all of the files are in the folder and retry the process.
To move on to the next step, click on Transform Data.
Step 3. How to Combine Excel Sheets With a Click
Now, a new window pops up with the list of files we're set to combine.
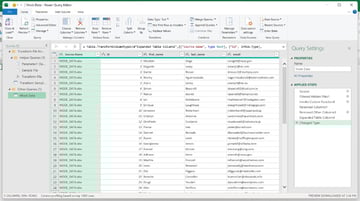
At this stage, you're still seeing metadata about the files and not the data itself. To solve that, click on the double drop-down arrow in the upper right corner of the first column.


You’ll see a new Combine Files menu appear. On the Display Options drop-down, click data. You’ll see a preview in the pane on the right. It shows exactly how your combined data will appear!


Review it, then click OK. Excel will run Power Query. It’s how to merge spreadsheets in Excel automatically. Wait for it to finish. Depending on the amount of data in your files, this may take a few moments.
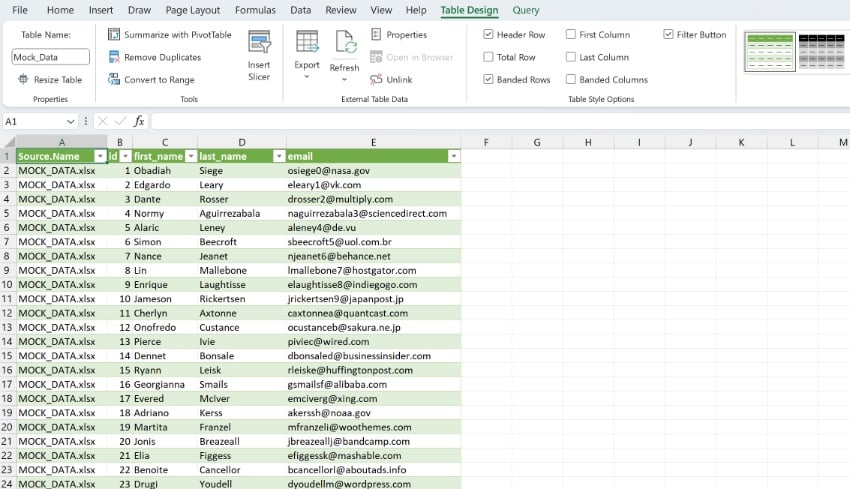
Voila! Now, you'll see the actual data from inside the files combined into one place.


Scroll through the data to confirm that all of your rows are there. Notice that the only change from your original data is that the filename of each source file is in the first column.
Step 4. Close and Load the Data
Believe it or not, we're basically finished with combining our Excel spreadsheets. The data is in the Query Editor for now, so we'll need to "send it back" to regular Excel so that we can work with it.
Click on Close & Load in the upper left corner. You'll see the finished data in a regular Excel spreadsheet, ready to review and work with.


Imagine using this feature to roll up multiple files from different members of your team. Choose a folder that you'll each store files in, and then combine them into one cohesive file with this feature in just a few minutes.
Common Microsoft Excel Questions Answered (FAQ)
You learned how to merge Excel files in our tutorial. But you may still have questions about Excel. How can it work for you? To help you, we’ve answered five common Microsoft Excel questions. These help you work smarter in Excel every day!
1. How Do I Sort Data Efficiently in Excel?
We learned how to merge Excel files. But with all this combined data, how can you sort it more efficiently? The best way is to use the Custom Sort tool. This way, you can manage huge volumes of data to view it exactly how you want.
For a full guide on efficient sorting in Excel, dive into our comprehensive tutorial! It’s the perfect companion to your new skills of how to merge two spreadsheets in Excel.
2. Do Macros Help Me Save Time in Excel?
Yes! Macros are codes or recorded actions that help you automate repetitive tasks in Excel. They’re useful for sorting, formatting, and data analysis tasks. If you do something over and over in Excel, odds are you can create a macro to make the process faster.
Learn more here:
3. Can I Make Tables in Excel?
Of course! Excel is a robust tool for processing data. And with the ability for Excel merging two spreadsheets, you’ll find yourself with row upon row of data. Tables make it easier to sort and filter this data.
They’re also much more visually appealing than basic rows and columns. Fortunately, they’re easy to create. It’s a vital skill now that you know how to combine two Excel spreadsheets.
For a look at how to build and work with Excel tables, check out our handy tutorial guide:


4. How Do I Manage Formulas in Excel?
Formulas really make Excel tick. Once you merge Excel spreadsheets, it’s useful to manipulate the data inside. Formulas are the most efficient way. They’re meant to streamline your tasks. It’s key to know time-saving steps, like the ability to copy and paste formulas. You can also autofill formulas to apply them to new data automatically.
Want to learn more? Check out the article below:

5. Can I Use Excel Spreadsheets in Google Sheets?
Yes! Google Sheets is a powerful online spreadsheet tool. You can work with it anywhere you have an internet connection. Files are stored and edited online. Once you’ve learned how to merge two Excel spreadsheets, you might find it useful. You can edit files anywhere - even on your phone!
In Google Sheets, you can upload an Excel file. Then, you can choose to Open with Google Sheets. This converts your XLSX file into a format that Sheets can view and edit. You can follow this even after you've used Excel merging two spreadsheets techniques.
For a full look at these steps, check out our guide below:
Learn More About Microsoft Excel (Tips and Tutorials)
Microsoft Excel is packed with useful, powerful features. Here are more great skills you can learn and start using every day!

 How to Create an Invoice in Excel Using a Template


 How to Embed Excel Files and Link Data Into PowerPoint

 How to Work With Excel Documents Using Python


 How to Format Your Excel Spreadsheets (Complete Guide)
The Top Source for the Best Microsoft Excel Templates (With Unlimited Downloads)
Envato Elements is the top source for the ultimate Microsoft Excel project templates. With thousands to choose from, it’s easy to find layouts for any project. From invoices to forms and more, Elements has you covered.
The Elements offer is powerful: unlimited downloads. For a flat monthly rate, you can download as many premium Microsoft Excel templates as you want!
And that’s just the beginning. Elements includes millions of digital assets. You’ll enjoy music, stock photos, fonts, and more. It’s the only stop you’ll need to make for all of your creative needs.
Choose a premium Envato Elements template and enjoy:
- Robust, beautiful designs. Accomplish serious work with files that look their best. Premium templates are designed by creative experts with you in mind.
- Easy-to-use features. Not a graphic designer or an Excel expert? There’s no need. Premium Elements assets are easy to use. Plus, many include helpful tutorial guides and videos.
- Time savings. With pre-built templates, all you have to do is drop your own content into place. You won’t spend precious time building layouts from scratch.
As you can see, Envato Elements is the best creative value in 2024. Join today and start exploring the vast library!
More Top Templates for Sharing Data
Excel templates help you accomplish more work in less time. We feature top templates that you can use for inspiration and accelerating your work.
Check out these articles that include top spreadsheet templates you can leverage. You can even use these with your new merging Excel spreadsheets skills.

 10+ Best Excel Invoice Templates to Help You Get Paid in 2023

-
How to Create an Invoice in Excel Using a Template

 15 Best Free Project Status Report Templates (Word, Excel, PPT for 2023)

Merge Two Excel Spreadsheets Today (Quickly and Easily)
In this tutorial, you learned how to merge two Excel spreadsheets. We looked at a quick way to copy sheets from one file to another. And we learned a powerful technique to merge Excel files together into one. With multiple options, it’s easy to choose one that works best for your project needs.
Merging Excel spreadsheets is a powerful workflow hack that you’ll use every day. When you do it, you’ll save time by avoiding the need for manually copying data. And you can ensure files updated by your global team always stay in sync. Link your favorite Envato Elements Excel template data together now.
Now that you know how to merge spreadsheets in Excel, it’s time to get to work! Think about how to use your new Excel spreadsheets skills today. Then, put them to use in your daily work. Tasks will become more efficient, and you can spend more time getting the most from your data. Knowing how to merge spreadsheets in Excel is essential. And, as you can see, it’s quick and easy.
Editorial Note: This post was originally published in 2018. It's been comprehensively reviewed and updated for accuracy by Andrew Childress.
 By
By


