How to Lock a PowerPoint Presentation (+Video)
You just got your creative presentation exactly right. Now you want to share it online or in your agency. But what if someone changes it? Prevent unwanted changes with PowerPoint password protection!


In this tutorial, you’ll learn how to lock a PowerPoint from editing. We’ll explore how to use password protect PowerPoint features to secure your slides. It only takes a few quick steps.
And when you complete these password protecting PowerPoint steps, you can rest easy. You'll know that your slides are guarded against unwanted edits. Once you know how to password protect a PowerPoint, you’ll see that it’s a common-sense step you’ll take every time you build your own slides.
Learn How to Build Amazing Presentations with our PPT eBook (Free)
We also have a helpful compliment to this tutorial. Download our FREE eBook: The Complete Guide to Making Great Presentations. Grab it now before you read on.


How to Quickly Password Protect Your PowerPoint Files (Quickstart Video)
If you like to learn via screencasts, we've got you covered. You'll see how to password protect a PPT with the quick video below.

Note: Watch this short tutorial screencast or follow the quick steps below that complement this video.
How to Lock and Protect Your PowerPoint Presentation
Using PowerPoint password protection is a key step to keeping your files safe. With global sharing, it’s all too easy for the wrong person to start editing or changing your slides!
That’s where password protecting PowerPoint slides comes in. Knowing how to password protect a PPT helps you stay safe and in control of all your slides.


In this quick tutorial guide, you’ll learn how to password protect a PowerPoint. We’ll demonstrate using the Be PowerPoint Presentation Template from Envato Elements. Download it today to follow along.
1. Launch the Info Menu
Learning how to password protect a PPT begins on PowerPoint’s Info menu. Here, you will find the powerful Protect Presentation settings. Think of these as the control center for security in PPT.
To see how to lock a PowerPoint from editing, begin by finding the File menu. This is in the upper left corner of the PowerPoint ribbon. Click on File.


On the left, shaded in orange, you’ll see a sidebar menu. From the list of options here, click on Info. The Info menu will launch and appear onscreen.
2. Lock PowerPoint from Editing with a Strong Password
On the Info menu, look at the option tabs in the middle. At the top, you’ll see Protect Presentation. Click on Protect Presentation. This is how to password protect a PPT with ease.


From the list of options, choose Encrypt with Password. The Encrypt Document menu will pop up. Here, you can type in a strong password. Key it in, re-enter the password, then click OK.


3. Open Slides to See PowerPoint Password Protection
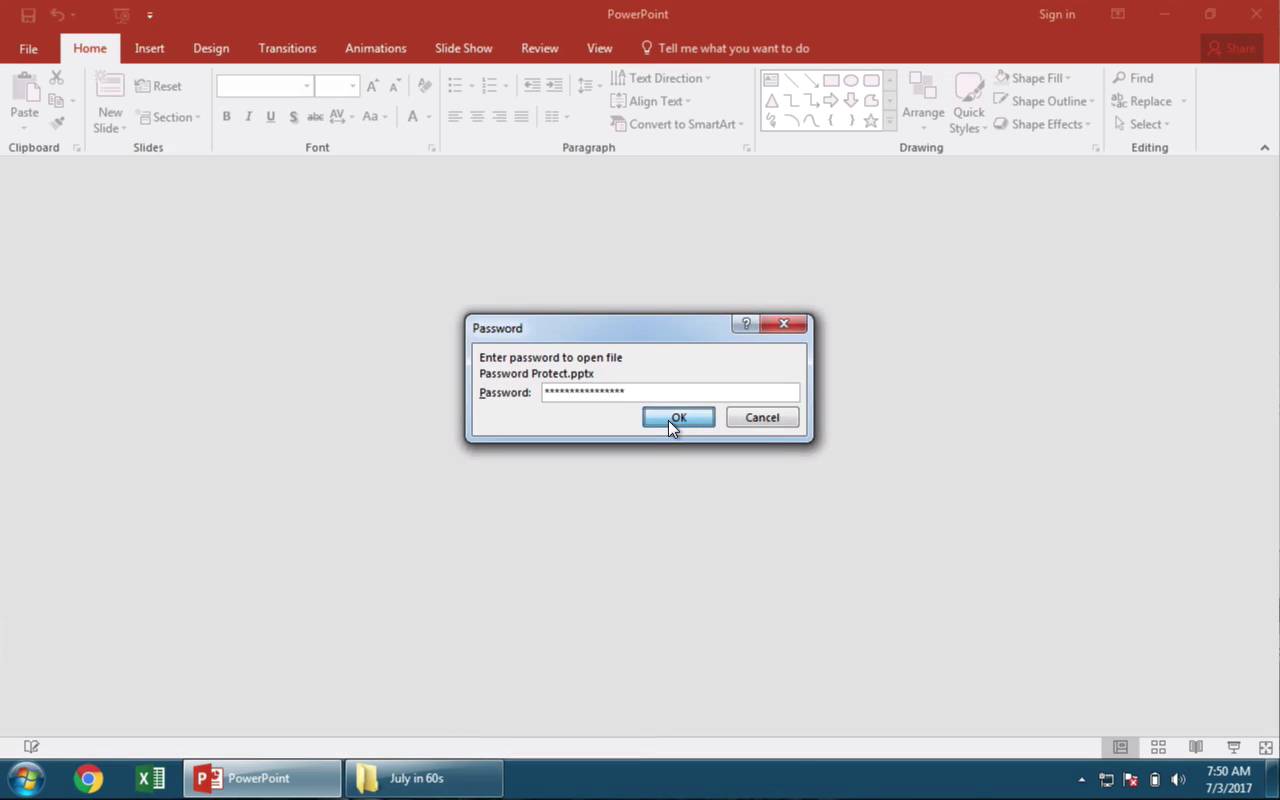
Now, when anyone opens your slides, they’ll see the password protect PowerPoint box appear. Before the slides open, they’ll be asked to input the password that you’ve chosen.


You can see this in action. Find your slides where you saved them and double-click to open them. When you do, you’ll immediately be prompted to enter a password.
You’ve just learned how to password protect a PowerPoint. As you can see, the password protect PowerPoint process is fast and easy.
4. Optional: Mark PowerPoint Slides as Final
There is a second, optional feature to lock a PowerPoint from editing. Think of it as an important version control feature. It helps encourage viewers to leave files unchanged. It’s called Mark as Final.


To mark slides as final, return to the File > Info tab. Once again, click on the Protect Presentation dropdown. But this time, click Mark as Final from the list of options. This marks your PPT slides as Read Only. Editors won’t be able to type or edit without saving a new copy. Thus, your original slide deck is protected.
It's possible that this feature is enough instead of password protecting PowerPoint files. You could simply signal this preference instead of applying the full lock PowerPoint from editing function.
Either way, these options will help you protect your PowerPoint file and make sure it's not edited any further. PowerPoint password protection is valuable, and it’s a key step in your slide design process. Start using it every day.
More Great Envato Tuts+ PowerPoint Tutorials
You've mastered the art of how to lock a PowerPoint from editing. These controls for password protecting PowerPoint files ensure that your file stays safe.
There's no reason to stop here. We have plenty more resources that add to your PowerPoint skillset. Learn more in our PowerPoint tutorials and quick video tutorials on Envato Tuts+. Here are a few pieces that are highly popular with our readers:


 What Is Microsoft PowerPoint? +How to Start Using It For Presentations (Now)

 Andrew Childress19 May 2019

 What Are the Right Dimensions (Size) for Your PowerPoint PPT Slides? (+ Video)

 Andrew Childress21 Sep 2023

 How to Get Started With Using SmartArt in PowerPoint (+Video)

 Andrew Childress30 Jan 2023

 How to Add Text to PowerPoint & Make Amazing Text Effects (+Video)

 Andrew Childress26 Dec 2022
Make Great Presentations (Free PDF eBook Download)
We also have the perfect complement to this tutorial, which will walk you through the complete presentation process. Learn how to write your presentation, design it like a pro, and prepare it to present powerfully.


Download our handy eBook: The Complete Guide to Making Great Presentations. It's available for free with a subscription to the Tuts+ Business Newsletter.
The Top Source for the Very Best PowerPoint Templates (With Unlimited Downloads)
Searching for the very best Microsoft PowerPoint templates? Envato Elements has you covered. For a flat monthly rate, you can explore thousands of stunning PPT slide deck designs. With unlimited downloads, you can easily try out as many as you want!


The Elements offer is powerful, and slide templates are only one of countless features. You’ll also enjoy fonts, stock photos, music, and so much more. As a creative, you’ll have tens of millions of digital assets to explore.


Elements helps you boost your design styles faster than ever. Our powerful new AI search technology is the ideal digital assistant for all of your creative needs. Building a project on a certain theme? Simply describe your project and watch as the perfect content is collected for you. In seconds, you’ll have the visuals and audio you need.
Envato Elements is the ultimate creative value in 2024 and beyond. So, what are you waiting for? Join today and get started.
Start Password Protecting PowerPoint Slides Today
In this tutorial, you learned how to password protect a PowerPoint deck. As you can see, it only takes a few clicks to password protect PowerPoint files. But the benefits are unmatched. With this simple process, you can avoid any unwanted changes. You can keep your work safe and secure after you lock PowerPoint from editing.
Begin with a stunning PowerPoint slide deck from Envato Elements. Build out slides and keep them safe by using lock PowerPoint from editing features. What are you waiting for? Truly, you can’t afford to skip PowerPoint password protection. Put your new skills to good use right now!
Editorial Note: This tutorial was originally published in September of 2017. It's been completely reviewed and revised for accuracy and relevancy by Andrew Childress.


